About a year ago, I decided that I wanted to be able to do more unbroken push-ups. I tried two workout plans to advance my max.
First, I did 20 every hour for about 8 hours of the day. I did that for a few weeks and found that it was too distracting from my work and I made little gains.
I then tried doing my max, unbroken push-ups once in the morning, and again in the evening. Using this method, I was able to advance my max by 20 whole push-ups over the period of about a month.
I was doing this max push-up routine twice a day, and found myself stuck at about 50 push-ups. I wanted to make more gains without taking too much more time out of my day. That is when I stumbled onto this 200 push-up challenge. I knew I was capable of doing 200 push-ups, as I had previously done 200 push-ups in an evening, but that was nothing in comparison.
Here is how the challenge works. You do your max, unbroken push-ups, and then pump out what ever is left to complete the 200 push-ups. Then you do this for 30 days strait, without rest days. You record the time taken to complete them, and the max that you did in the beginning.
A little over a month ago, I started the challenge. I did my max unbroken push-ups to start which was only 45. About 100 in, I was down to reps of 1 before taking a break, and it was taking far too long for my liking. I took a couple hours break and came back to it. After two days, I stopped breaking my 200 up, and did them all in one go (making the times for the first two days not fully honest compared to the others). Here is a graph of my results:
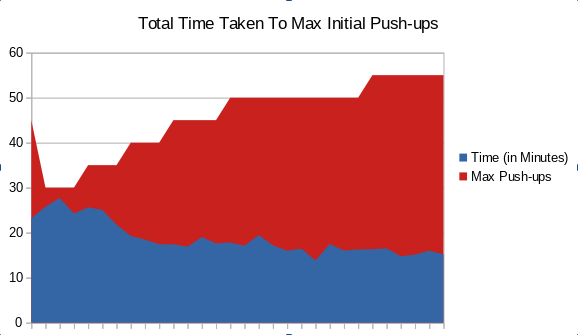
As you can see, in the beginning my max takes a sharp drop as my time goes up. The first week was brutal and all I had was sore muscles with little apparent gains. Slowly but surely, my times dropped, and when I felt comfortable, I tried to crank out 5 more at the start (that way I wasn’t wasting a bunch of time trying to get just 1 more).
After doing this for 20 days, I was bored of doing so much of the same motion. I mixed it up by doing push-up variations every other day. Out of my 200, I did 20 inclined push-ups, 20 declined push-ups, and 20 diamond push-ups.
At the end of the challenge, I was at 55 for my max. This was good, but I knew that after a couple rest days, I could do better. Three days later, I got to it to see what new personal record I could set. I got to fifty quite quickly and then not to long later, I was at 70. It was a struggle on those last few, and although I might have been able to do a few more, I was happy with that even 70.
Many people have discussed the importance of rest days to make gains, and although I am happy with the gains I made during this challenge, I am quite interested in what the results would be with rest days.